
使用布局库快速创建自定义工作区布局。只需仔细阅读布局库并选择布局,例如“期权交易”或“期货点差”。只需单击一下即可将其添加到您的平台,并通过单击TWS框架底部的选项卡轻松切换布局。

使用布局库
1. 单击框架底部选项卡集末尾的“添加”选项卡(“+”)图标。
2. "选择“布局库”。
3. 浏览布局,点击详情可查看更多关于此布局的信息。
4. 点击添加布局可新建布局。新建布局将以一个新的,重新命名的标签显示在TWS底部。

您可以以原始形态使用此布局,或解锁并编辑它以使其成为您个性化的布局。您可以添加,删除和重新调整工具大小,并使用窗口链接来链接布局中的工具。修改大多数窗口中的背景和字体颜色,包含的字段和字段顺序。
根据需要添加任意数量的布局。可通过选择“创建新的自定义布局”而不用点击“打开布局库”,新建布局。
Mosaic有两种编辑模式:锁定和非锁定。
默认情况下,启动工具时Mosaic工作区处于“锁定”模式。当工作空间被锁定时,它将充当单个分组单元。您无法添加,删除,重新调整大小或移动任何组件窗口,但您可以重新调整整个工作区的大小,并且相应地缩放其中的每个组件。但请注意,您可以修改窗口分组分配。我们默认锁定工作区,以避免无意中删除和移动单个组件的潜在问题。
如果要重新排列窗口,添加或删除窗口,或重新调整单个组件窗口的大小,请单击“锁定”图标以解锁工作区。
布局锁定
当Mosaic布局被锁定时,工作区以黑色轮廓,锁定标签指示状态。保持布局锁定,直到您需要添加,删除或调整单个窗口的大小。
解锁布局以对其进行编辑
- 点击搜索字段左侧的“锁定”图标
布局解锁
解锁Mosaic布局后,工作区将显示为绿色,并且锁定图标似乎已打开以指示状态。解锁后,工作区框架内的窗口将作为单独的未组合窗口,您可以删除它们,重新调整它们的大小,并向布局框架添加新窗口。
注意:确保在完成编辑后始终锁定工作区,以避免对Mosaic进行不必要的更改或删除。如果工作区为解锁状态,则不允许您退出应用程序。
锁定布局
- 点击“锁定”图标。
Mosaic字体
快速增大或缩小Mosaic窗口字体。
调整整个Mosaic中的字体大小
- 在Mosaic菜单中点击“调整字体大小”图标
- 单击“更小”或“更大”以更改字体大小。请注意,单击时,Mosaic中的字体大小会发生变化。
- 选中“调整窗口和列宽”以保持字体与窗口的大小比例相同。如果未选中,则所有窗口将保持相同的大小,只有字体大小会改变。
添加和删除字段
通过将鼠标悬停在字段名称上可以快速添加和删除大多数窗口中的字段,以调用插入/删除列命令。

在窗口中添加和删除列
- 将鼠标悬停在某个字段上以调用快速插入/删除命令。
- 单击“+”图标以在所选列的左侧插入一列。从单击“插入列”时出现的下拉选项列表中选择。
- 单击“x”图标以从窗口中删除所选列。您可以随时重新添加它。
您可以通过从“全局配置”的“显示”>“设置”页面中取消选择“快速插入/删除列标题中的列”功能来选择不看这些图标。
使用集成搜索工具
锚点窗口右上角的集成搜索工具允许您搜索应用程序中的工具和功能,以及我们数据库中的合约以添加到您的交易页面。检查“申请”并从结果列表中选择直接到达您选择的目的地。选中“合约(Contracts)”并选择将工具直接添加到您的交易页面。

搜索某项功能或产品
- 输入要查找的功能,产品或产品类型的名称。
- 查看申请,合约或两项一起。
- 勾选符合您搜索条件的选项。
注意:当您使用搜索功能时,将自动打开并关注该功能,或开始将该工具添加到交易页面。
订单通道面板
使用”订单通道面板“创建,提交或保存订单。它通过窗口颜色分组链接到其他窗口,这意味着当您从组中的另一个窗口中选择一个工具时,订单通道面板将被“加载”该工具并准备提交订单。通过从下拉列表中的曾用产品选择或手动输入新的产品,可以轻松更改资产内容。要设置期权订单,请单击期权链按钮以轻松选择期权合约。
使用“高级”面板可以包含其他订单属性,以及创建OCO,获利了结或对冲订单。

订单通道面板支持不同的模式,您可以修改模式以适合您的交易方式。上图显示了交互模式下的面板。
更改订单通道模式
- 单击面板标题栏右上角的配置齿轮图标,然后选择“设置”。
- 选择订单通道工具模式。选择:
- 交互式:启用可点击的“头寸”和“出价/中间/询问”标尺以填写订单参数。
- 简化:显示更少,选择更少。
- 快速发送:单击“卖出”或“买入”按钮快速提交订单。此版本不包含“提交”按钮。
监视订单和交易状态
ACTIVITY面板中的Mosaic订单和交易面板提供所有实时,已取消和已完成订单和交易的运行列表。
单击显示下拉列表(上图中的ALL)以指定要在“订单”窗口中显示的订单类型。从中选择:
- 所有订单(ALL ORDERS)
- 实时订单(LIVE ORDERS)
- 取消订单(CANCELED ORDERS)
- 完成订单(COMPLETED ORDERS)
在交易选项卡中查看已平仓的订单。深入查看每笔交易的详细价格和数量信息。
投资组合
“Mosaic投资组合”窗口,与“Mosaic市场扫描仪”和“关注列表”一起,存在于“监视器面板”选项卡组中,提供了关键帐户信息。
注意:“投资组合”窗口是Windows分组的“来源”,这意味着当您选择资产时,所有链接的窗口都将显示该资产。

首次打开投资组合
- 在监视器面板中,点击”+“号添加新的页面。
- 在下拉列表中,选择投资组合。
注意:将投资组合添加到监视器列表后,它将作为一个选项卡。如果您无法在“监视器”面板的顶部看到它,请使用向左和向右箭头图标滚动选项卡以查看所有可用选项卡。
Mosaic市场扫描仪
从Mosaic布局中创建,自定义,编辑和查看Mosaic市场扫描仪。您可以创建新的自定义扫描仪,或选择预定义的Mosaic市场扫描仪。
- 在Mosaic中,单击“监视器”窗口中的“添加新窗口”图标,然后选择Mosaic市场扫描仪。
- 选择“创建新的自定义扫描...”并输入扫描标题。
- 定义扫描“Universe”,包括产品,区域,交易所,仪器类型,索引和可选的行业过滤器。在定义Universe时,您可以在扫描仪窗口中看到市场扫描仪结果。
- 使用“字段”部分添加,删除和管理每个显示的值。在一个字段上使用双重排序,以显示在所选字段上按两个方向排序的扫描仪。要更改扫描中字段的显示顺序,请将字段拖放到所需的顺序中。
每个字段提供“显示”和“排序”选择。使用这些选择器可以自定义和组织扫描数据。
”显示“字段信息
”排序“字段信息
- 单击“完成”以完成扫描。单击扫描窗口右上角的“编辑扫描仪”可随时修改任何Mosaic市场扫描仪。
打开或编辑现有扫描仪
- 将鼠标悬停在选项卡集上以显示所有可用选项卡。
- 单击“监视器”窗口中的扫描仪选项卡。
您可以将扫描结果导出到Excel电子表格,以允许您使用和操作数据。
导出扫描仪结果
- 完成定义扫描仪标准(或“编辑”扫描仪)。
- 在扫描仪编辑窗口的底部,单击“导出结果”。
- 输入文件的名称,并根据需要修改“保存位置”。单击保存。
扫描结果会以扩展名为 .csv的文件保存。
关注列表
关注列表中包含双栏的代号,上一个交易价格和上次交易后的价格和变化。彩色刻度点表示值是增加(绿色)还是减少(红色)。通过任何产品代码中的右键菜单即可访问交易和分析工具,以及编辑关注列表。
通过输入基础代码并选择资产类型,将产品代码添加到关注列表。
在Mosaic中添加关注列表
- 单击新页面图标以添加页面
- 从工具列表中选择关注列表。
- 如果需要,单击重命名当前关注列表以命名关注列表。否则,关注列表名默认为Watchlist1,Watchlist2等。
- 在关注列表中添加行情跑马灯。
在经典TWS中添加关注列表
- 在交易工具菜单中选择关注列表。
- 如有需要,点击重命名当前关注列表即可命名关注列表。否则关注列表默认名为Watchlist1,Wathclist2等。
- 在关注列表中添加行情跑马灯。
新建订单
在TWS中创建订单的方法有很多种。这里主要介绍如何直接从报价监视器中的股票行创建和发送订单。
在报价监视器中创建和发送订单
- 单击市场数据行中的“询价(Ask)”或“出价(Bid)”,在所选股票代码的正下方创建订单行。
- 点击“询价(Ask)”创建“买入(Buy)“单
- 点击”出价(Bid)“ 创建”卖出(Sell)“单
- 在订单行上,根据需要修改订单参数,包括有效时间,操作,数量,价格,订单类型或目的地。
- 注意:要使用默认值更有效地进行交易,请使用全局配置中的订单预设创建订单预设策略要发送订单,请单击“发送”(如果减小了“发送”字段的大小,则单击“T”)。
显示订单
默认情况下,工作订单将显示在具有股票代码的任何页面上。您可以使用“页面”设置修改要显示工作订单的位置。
- 右键单击选项卡式标题,然后选择“设置”。
- 仅显示在此页面上创建的订单 - 无论代码如何,只有您在此页面上创建的订单才会显示在此页面上。
- 仅显示非活动订单,将活动订单移至待处理页面 - 仅显示已停用或未发送的订单。从此页面创建的工作订单仅显示在“待定”页面上。
修改订单
在填写完成之前您都可以修改订单。在此之前,订单仍然可见且可编辑。
使用Mosaic
工作订单显示在“订单”面板中,可以通过单击相应的字段进行编辑。
使用便捷订单通道
订单行显示在创建它的页面上的行情跑马灯下方,并显示在“待定”页面上。如果订单状态为绿色,则订单“正常工作”。
注意:VWAP订单会被立即接收,不能修改。
修改已运作的订单
- 在订单行上,单击要修改的字段,然后进行更改。
注意:具有与其关联的子订单的订单(例如归类或缩放订单)不能修改订单状态。可以修改的订单将在操作下拉列表中的反向操作旁边注明可收回(Reverse)。当您对订单进行回收操作时,将为原始订单发送取消请求,并显示具有取消请求的原件和新的修改后的订单。
单击“发送”列中的“更新”以发送已修改的订单。
要在传输之前撤消更改,请右键单击并选择“丢弃修改”。
注意:在您的修改后的订单还未在交易所替换时,您的原始订单可能随时平仓。有关修改和取消订单的具体详细信息,请参阅客户协议。
发送订单
在订单管理行上验证订单参数后,即可发送订单。
![]()
发送订单
- 在”发送(Transmit)“区域中点击发送(如果您缩小了区域面积,则显示为"T"),或者
- 在订单行中使用右击菜单选择发送
当目的地接受订单时,它将成为“工作”订单。所有工作订单都显示在“待处理”页面上。红色标签标题表示该页面包含工作订单。
![]()
批量发送订单
- 在交易菜单中选择发送(Transmit),然后选择:
- 发送所选订单以提交您在当前页面上选择的订单。
- 发送页面上所有订单以发送当前页面上的所有订单。括号中的美元值反映了页面上所有订单的总价值。
- 发送所有订单以提交在TWS中的所有订单。
取消订单
对于工作订单,“取消(Cancel)”命令会向订单目标发送取消请求。有关订单管理行上状态颜色的含义,请参阅订单状态颜色页面。
对于未传输的订单,请使用右键单击“放弃(Discard)”命令从交易屏幕中删除所选订单。
您可以在订单执行之前取消任何订单。您还可以选择取消页面上的所有订单或工作站上的所有订单。
取消工作订单
- 在交易菜单(Trade)中选择取消(Cancel),然后选择:
- 取消所选订单(Cancel Selected Orders)以提交您在当前页面上选择的订单的取消请求
- 取消页面上的所有订单(Cancel All Orders on Page)以取消当前页面上的所有工作和未提交的订单。
- 取消所有订单(Cancel All Orders)以提交TWS中所有订单的取消请求。
- 或者,在取消区域中点击取消(或”C“如果您缩小了页面区域面积)
有关“状态”字段中显示的颜色的信息,请参阅“订单状态颜色”主题。
注意:在状态字段变为红色之前,您的工作订单未确认已取消。有关订单确认/取消的更多信息,请参阅相应的客户协议。
添加报价监视器
在TWS中创建的报价监视器的数量是没有限制的。您可以根据需要输入尽可能多的市场数据,但在任何时候,您一次只能看到100个活跃的市场数据行。更多详情请参阅市场数据应用指南。使用报价监视器按产品类型,交易所或您自己的交易系统类别对资产进行排序。通过使用Ctrl键以及Page Up和Page Down键,您可以在不使用鼠标的情况下浏览选项卡式页面。
- 要分离页面,只需单击选项卡并将页面拖离页面即可。
- 要新建页面,请单击“+”号然后选择报价监视器(Quote Monitor)
- 要删除页面,请点击叉号“X"。
- 要重命名页面,需右击页面标题栏然后选择重命名页面(Rename Page)。
您还可以使用名为“快速股票输入”的页面功能,该功能将使用您设置的订单目的地集自动完成股票的市场数据行。
添加一个投资组合页面
您可以创建一个系统会自动更新的报价监视器,其中包含投资组合中每个头寸的数据行。使用“+”符号中的右键菜单,然后选择“投资组合窗口(Portfolio Window)”。投资组合页面只能创建一次。
这样创建的页面中的头寸与“帐户”窗口中“投资组合”部分中显示的头寸相同。每次您持仓时,投资组合页面都会自动更新,以包含新头寸的市场数据。当您将头寸清零时,市场数据仍会保留在您的投资组合页面上。 您可以使用页面上的右键单击菜单并选择“删除零头寸数列(Clear Zero Position Rows)”,从其他页面中删除零头寸的标记。
登录TWS:
- 双击安装时自动放置在桌面上的Trader Workstation快捷方式图标。
- 在实时和模拟交易之间单击进行选择。如果您选择实时交易,则登录框为深蓝色。 如果您选择模拟交易,则登录框为深红色。
- 输入用户名和密码,点击登录。
Rockfort Markets在新西兰获得了衍生产品发行人许可,这需要我们遵守严格的规则和法规,并意味着我们受到金融市场管理局的监督。 FSPR或金融服务提供商注册部门是专为新西兰金融公司进行登记的机构,这被许多海外公司滥用,他们假装他们有许可证,而事实上没有。 他们甚至通常不在新西兰。
您应该只与持牌公司合作并仔细检查与您的合作方,因为许多无牌公司不保护您的资金,而且往往只是诈骗。
获得更多信息请查看我们许可和监管页面。
您只需在我们网站上的模拟账户页面申请开通模拟账户即可。这将允许您试用我们的交易平台以及测试您的交易策略。
我们有许多不同的交易账户类型,请查看账户类型页面获得更多详细信息。
点击此处入金。
我们提供多种入金方式。对于新西兰境内客户,直接银行转账一般需要1-2小时(周一至周五工作日)结算。
通过Poli Pay支付的资金将在入金后第二个工作日结算。
通过Visa,万事达卡通常会在1-2小时内(周一至周五工作时间内)支付。
通过银行电汇(国际SWIFT)出入金将在2-4个工作日内结算,具体取决于您的银行,货币种类和国家。
如果您需要加急处理或您的资金没有按时转入您的帐户,请联系我们。
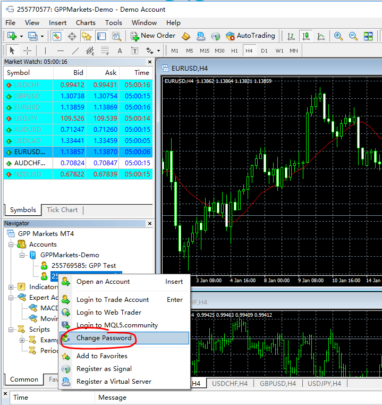
您可以登录您的交易账户,在导航器下,右键单击您的账号,您将在那里找到更改密码的选项。

您需要选择带有.GM的产品并双击它(如果您想要交易的产品不可见,请先将其添加到您的市场观察列表中)。
选择您的交易量,在“市价订单”,“限价订单”或“停止下单”之间进行选择,输入交易规模,然后按Enter键。 您可以选择为限价和止损订单添加任何“止损”和“止盈”条件,然后下订单。更多详细信息请查看我们的风险管理页面。
详情请见费用页面。
我们提供外汇,贵金属,大宗商品以及指数的差价合约产品。
更多详细信息请查看我们产品介绍页面。
我们竭力为您提供最低的点差。请查看点差页面获得更多详细信息。
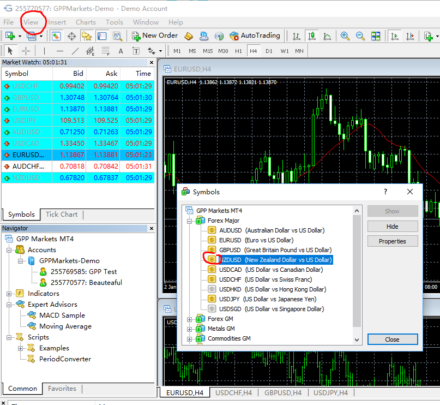
在菜单栏上,打开视图>符号,您将看到列出的所有Rockfort Markets产品,双击要添加的产品,它将显示在主屏幕上。

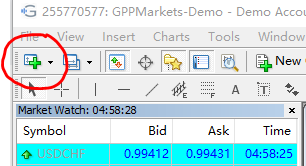
在菜单的第二行,单击带有绿色+的第一个按钮,即可添加新图表。
杠杆使您可以利用相对较少的资金交易较大金额的产品。 杠杆通过这种方式,扩大了盈利和亏损的范围。
我们只需要您存入少量保证金即可持有大额头寸,对于我们的大多数产品而言,典型保证金率仅为1%。
即使您只提供相对较少的资金来开仓,您的盈利或亏损也是基于头寸的全部价值。 因此,与您的初始支出相比,您获得或减少的金额可能相对较大。
更多详细信息请查看我们交易知识页面。
1. 损失可能超过您账户中资金金额:
差价合约是杠杆化的,这意味着您只需要将交易价值的一小部分用于开仓。 因此,您可能会失去 – 或获得 – 远远超过您的初始入金的金额。
您可以通过在自动停止订单或限制订单中设置您希望平仓的价格,来降低风险并保证盈利。
2. 强制平仓导致亏损。
您需要在帐户中支付一定的金额才能保持交易畅通。 这称为保证金,如果您的账户余额未满足我们的保证金要求,我们可能会为您平仓。
在我们的平台或应用程序中密切关注您始终可见的余额变化,并在需要时添加更多资金。
3. 突然或大于预期的亏损(或盈利)
市场可能会波动,在公告,事件或交易者行为的影响下非常迅速和出乎意料地变化。
除了设置停止点,您还可以通过设置价格或距离警报来通知重要的变化,以方便您及时决定是否对此做出反应。
4. 开仓/平仓价格(根据您给我们的指示,当市场达到一定价格时为您开启或关闭交易)与您设定的不同。
当市场在一瞬间发生巨大变化 – 或“裂口” – 您所下的任何订单可能会以比您设定价格更低的价格平仓。 这称为滑点。
查看我们的风险管理页面获得更多详细信息。
我们的目标是始终为您提供最好的客户服务,但是,如果您觉得我们没有达到您的期望,我们希望听到您的意见。
请查看申诉页面帮助我们提高服务质量。
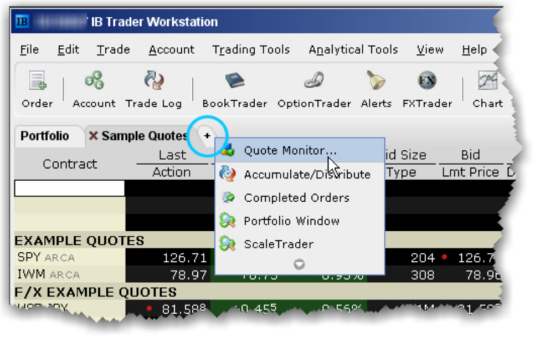
Add a Quote Monitor
There is no limit to the number of Quote Monitors you can create in TWS. You can enter as many lines of market data as you want, but at any one time you will only be able to see 100 active market data lines at a time. For details, see Notes about Market Data use. Use the Quote Monitors to sort your assets by instrument type, exchange, or your own trading system categories. You can navigate through the tabbed pages without the mouse by using the Ctrl key along with the Page Up and Page Down keys.
- To detach a page, simply click the tab and drag the page away from the tabset.
- To create a new page, click the “+” sign and select Quote Monitor
- To delete a page, click the X.
- To rename a page, right-click the page title and select Rename Page.
You can also use a page-level feature called Quick Stock Entry, which will automatically complete a market data line for a stock using the set of order destinations you set up.
To add a Portfolio Page
You can create a system-maintained Quote Monitor that includes a data line for each position in your portfolio. Use the right-click menu from the “+” sign and select Portfolio Window. The portfolio page can only be created once.
This creates a page with the same positions that are displayed in the Portfolio section of the Account window. Each time you take a position, the Portfolio page is automatically updated to include market data for the new position. When you zero out a position, the market data line remains on your Portfolio page. You can remove zero position tickers from this and other pages using the right-click menu on a page and selecting Clear Zero Position Rows.
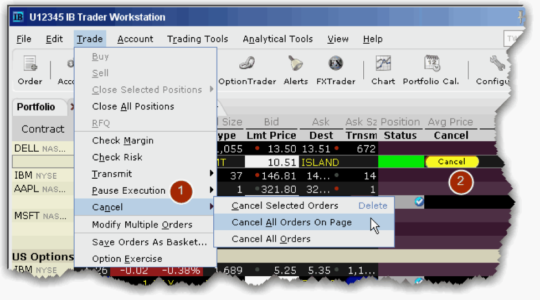
Cancel an Order
For a working order, the Cancel command sends a cancellation request to the order destination. See the Order Status Colors page for the meaning of status colors on an order management line.
For a non-transmitted order, use the right-click Discard command to delete the selected order(s) from your trading screen.
You can cancel any working order up until the time it has been executed at an order destination. You can also choose to cancel all orders on a page or all orders on your workstation.
To cancel a working order
- From the Trade menu select Cancel, and then select:
- Cancel Selected Orders to submit a cancel request for the order(s) you have selected on the current page
- Cancel All Orders on Page to cancel all working and non-submitted orders on the current page.
- Cancel All Orders to submit a cancel request for all orders in TWS.
- Or,Click Cancel (or “C” if you have reduced the field size) in the Cancel field.
For information on the colors displayed in the Status field, see the Order Status Colorstopic.
Note: Your working order is not confirmed CANCELED until the status field turns red. Please see the appropriate Customer Agreement for further information on order confirmation/cancellation.
Leverage enables you to gain a large exposure to a financial market while only tying up a relatively small amount of your capital. In this way, leverage magnifies the scope for both gains and losses.
We only require you to deposit a small amount of margin to hold large positions, for most of our products the typical margin rate is only 1%.
Even though you only put up a relatively small amount of capital to open a position, your profit or loss is based on the full value of the position. Therefore, the amount you gain or lose could be relatively large compared to your initial outlay.
For more information please check our Education page.
On the second line of the menu, click the first button with green + and to add new chart.

On the menu bar, open View > Symbols, you will see all Rockfort Markets products listed, double click the product you want to add, and it will show on the main screen.
在Rockfort Markets,我们确保您的所有资金存储在单独的客户资金账户中与我们的运营账户隔离。
作为新西兰受监管的衍生产品发行人许可证持有人,我们遵守所有适用的金融市场法规,包括新西兰客户资金法规。 这意味着客户资金与运营资金隔离并每日检查,且由我们的财务审计师安永(EY)定期审核。 我们在新西兰的所有客户的资金均存储于澳新银行(ANZ)。
请参看资金安全页面获得更多详细信息。
At Rockfort markets we make sure that all your funds are kept separate from our operational accounts in a separate client funds account.
As a regulated Derivate Issuer License holder in New Zealand, we follow all applicable Financial Markets Legislation, including the New Zealand client money regulations. This means client money is segregated from operational funds and checked on a daily basis and audited by our financial auditor.
Please check Money Safety page for more details.
We are constantly looking for the best spreads for you, please check Spreads page for more details.
We offer Contract for Difference (CFDs) on FX, Metals, Commodities, Indices.
For more information, please find our product schedule here.
Please check Fees and Charges page.
You will need to select the product with .GM and double click on it. (If the product you want to trade is not visible add it to your market watch list first)
Choose your volume, choose between ‘Market Order’, ‘Limit Order’, or ‘Stop Entry Order’, input the trade size and then hit enter. Optionally you can add any ‘Stop Loss’ and ‘Take Profit’ levels for limit and stop orders and then place your order. For more details please check our Risk Management page.
You can login to your trading account, under Navigator, right click your account number, there you will find an option to change the password.
We offer many ways to deposit your fund. For domestic clients in New Zealand, direct internet bank transfer usually takes 1-2 hours to settle during business hours Mon-Fri.
Payments through Poli Pay settles the next working day.
Payments through Visa, Mastercard typically take 1-2 hours inside business hours Mon-Fri.
Withdrawals and deposits overseas by bank transfer (SWIFT transfer) can take between 2-4 days depending on the country, currency and your bank.
Please contact us if you need the payment to be applied urgently or payment has not been applied to your account yet.
You can withdraw your funds by clicking here. It will take between 24-48 hours to process your application. Please be aware that you can only withdraw your fund to the bank account under your name.
You can deposit funds by clicking here
We have a number of different trading accounts, please check Account Types page for details.
You can open a free demo account easily through Demo Account page on our website. This will allow you try out the platform and your trading strategies.
1. Losing more than the money in your account:
CFDs are leveraged meaning you only need to put up a fraction of your trade’s value to open it. So you could lose – or gain – much more than your initial deposit.
You can mitigate risk and lock in profits by setting an automatic stop or limit, to define the level you’d like your trade closed at.
2. Having your positions closed unexpectedly, resulting in you losing money.
You need a certain amount of money in your account to keep your trades open. This is called margin, and if your account balance doesn’t cover our margin requirements we may close your positions for you.
Keep an eye on your always-visible running balances in our platform or app and add more funds if they’re needed.
3. Sudden or larger-than-expected losses (or gains).
Markets can be volatile, moving very quickly and unexpectedly in reaction to announcements, events or trader behaviour.
As well as setting stops, you can also be notified of significant movement by setting a price or distance alert, giving you the choice of whether or not to react.
4. Having an order (an instruction you give us, to open or close a trade for you when the market hits a certain level) filled at a different level to the one you requested.
When a market moves a long way in an instant – or ‘gaps’ – any orders you have placed may be filled at a worse level than the one you requested. This is called slippage.
Check our Risk Management page for more details.
We aim to provide you with the best customer service at all times, however if you feel we have not met your expectations we want to hear from you.
Please check Complaints page to see how you can raise it with us
Transmit an Order
Once you have verified the order parameters on an order management line, you are ready to transmit your order.
![]()
To transmit an order
- Click Transmit (or “T” if you have reduced the size of the field) in the Transmit field, or
- Use the right-click menu on the order line and select
When an order is accepted at the destination, it becomes a “working” order. All working orders appear on the Pending page. A red tab title indicates that the page holds a working order.
![]()
To transmit multiple orders
- From the Trade menu select Transmit, and then select:
- Transmit Selected Orders to submit the orders you have selected on the current page
- Transmit All Orders on Page to send all of the orders on the current page. The dollar value in parenthesis reflects the total value of all orders on the page.
- Transmit All Orders to submit all orders in TWS.
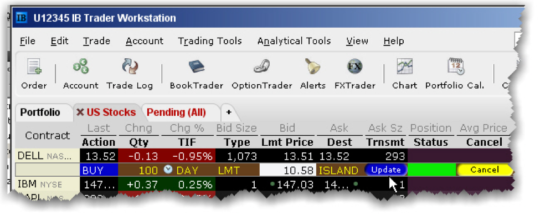
Modify an Order
You can modify an order up until the time it fills. Until this occurs, the order remains visible and editable.
Using Mosaic
Working orders appear in the Orders panel, and can be edited by clicking the appropriate field.
Using Advanced Order Entry
The order line appears below the ticker on the page on which it was created, and on the Pending page. An order is “working” if the order status is green.
Note: VWAP orders are accepted immediately and cannot be modified.
To modify a working order
- On an order line, click in the field you want to modify, and make your change.
Note: Orders that have child orders associated with them, such as bracket or scale orders, cannot have the order side flipped. Orders than can be flipped will note this using (Reverse) next to the opposite-side action in the Action drop-down. When you flip the order side, a cancel request is sent for the original order and both the original with the cancel request and the new reversed order are displayed.
Click Update in the Transmit column to transmit your modified order.
To undo changes before you transmit, right-click and choose Discard Modifications.
Note: You may receive a fill on the original order before your modified order has replaced it on the exchange. Please see the Customer Agreement for specific details on modifying and canceling orders.
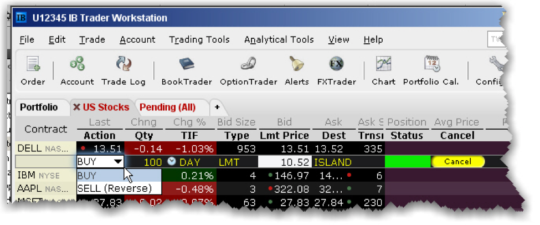
Create an Order
There are many ways to create an order in TWS. This topic shows you how to create and transmit an order directly from a ticker line in the Quote Monitor.
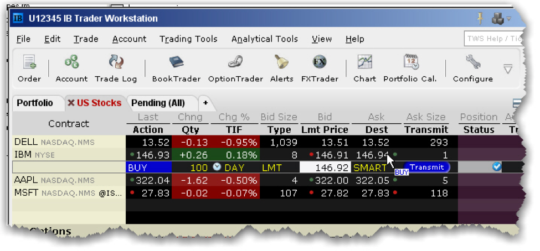
To create and transmit an order from the Quote Monitor
- Click the Ask or Bid in a market data line to create an order line directly below the selected ticker.
- Click the Ask to create a Buy
- Click the Bid to create a Sell
- On the Order line, modify the order parameters including Time in Force, Action, Quantity, Price, Order Type, or Destination, if needed.
- Note: To trade more efficiently by using default values, create order Preset strategies using the Order Presets in Global Configuration.To transmit your order, click “Transmit” (or “T” if you have reduced the size of the Transmit field).
Show Orders
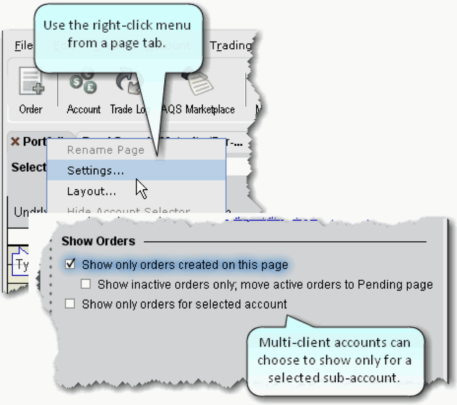
By default, a working order will display on any page that has the ticker. You can modify where you want working orders to display using the Page settings.
- Right click a tabbed title and select Settings.
- Show only orders created on this page - Regardless of the tickers, only the orders you create from this page will display on this page.
- Show inactive orders only, move active orders to Pending page - Shows deactivated or non-transmitted orders only. Working orders created from this page will only display on the Pending page.
The Watchlist
Watchlists hold double columns of tickers with the symbol, last price and change since the last trade. Coloured tick dots indicate whether the value has increased (green) or decreased (red). Use the right-click menu from any ticker to access trading and analytical tools, and to edit the Watchlist.
Add tickers to a Watchlist by entering the underlying symbol and selecting the asset type.
To add a Watchlist in Mosaic
- Click the new page icon to add a page.
- From the tools list select Watchlist.
- Click Rename Current Watchlist to name the Watchlist if desired. Otherwise, Watchlists are named Watchlist1, Watchlist2 etc.
- Add tickers to the Watchlist.
To add a Watchlist in Classic TWS
- From the Trading Tools menu select Watchlist.
- Click Rename Current Watchlist to name the Watchlist if desired. Otherwise, Watchlists are named Watchlist1, Watchlist2 etc.
- Add tickers to the Watchlist.
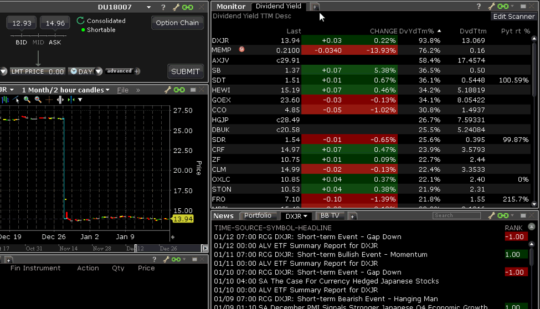
Mosaic Market Scanners
Create, customize, edit and view Mosaic Market Scanners from within the Mosaic layout. You can create a new custom scanner, or choose a Predefined Mosaic Market Scanner.
- From within Mosaic, click the "add new window" icon in the Monitor window and select Mosaic Market Scanner.
- Select Create new custom scan... and enter a title for the scan.
- Define the scan "Universe" including the product(s), region(s), exchange(s), instrument type(s), indices, and optional industry filters. You can see the market scanner results in the scanner pane as you define the universe.
- Use the Fields section to add, remove, and manage each displayed value. Use Dual Sort on one field to show the scanner sorted in both directions on the selected field. To change the order in which fields are displayed in the scan, drag and drop fields into the desired order.
Each field provides a "Display" and "Sort" selection. Use these selectors to customize and organize scan data.
"Display" Field Information
"Sort" Field Information
- Click Done to complete the scan. Click Edit Scanner at the top right of the scan window to modify any Mosaic Market Scanner at any time.
To open or edit an existing scanner
- Hold your mouse over the tab set to show all available tabs.
- Click a scanner tab on the Monitor window.
You can export the scan results to an Excel spreadsheet to allow you to use and manipulate the data.
To export scanner results
- Complete defining the scanner criteria (or "Edit" the scanner).
- At the bottom of the scanner edit window, click Export Results.
- Enter a name for the file, and modify the Save in location if desired. Click Save.
The scan data is now saved in a .csv file. \
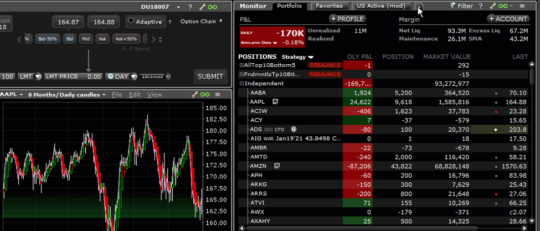
The Portfolio
The Mosaic Portfolio window, which is included in the grouping of Monitor Panel tabs along with the Mosaic Market Scanners and the Watchlists, provides key account information.
Note: The Portfolio window is a "source" for windows grouping, which means that when you select an asset all linked windows will display that asset.
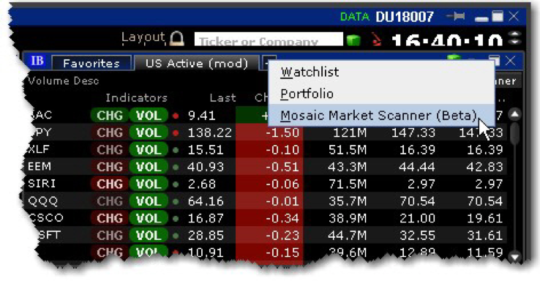
To open the Portfolio for the first time
- From the Monitor panel, click "+" sign to add a new page.
- From the drop down list, select Portfolio.
Note: Once you add the Portfolio to your Monitor list, it will be available as a tab. If you can't see it displayed along the top of the Monitor panel, scroll through tabs using the left and right arrow icons to view all available tabs.
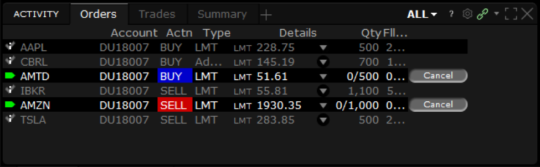
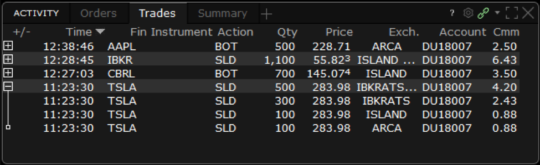
Monitor Orders & Trades
The Mosaic Orders and Trades panels in the ACTIVITY panel provide a running list of all live, canceled and completed orders and trades.
Click the display drop-down (ALL in the above image) to specify which order types to display in the Orders window. Choose from:
- ALL ORDERS
- LIVE ORDERS
- CANCELED ORDERS
- COMPLETED ORDERS
View filled orders in the Trades tab. Drill down per trade to view detailed price and quantity information.
The Order Entry Panel
Use the Order Entry panel to create and then Submit or Save an order. It's linked via windows color grouping to other windows, which means that when you choose an instrument from another window in the group, the Order Entry panel is "loaded" with that instrument and ready to submit an order. It's easy to change the asset by selecting from the drop down list of previously used instruments, or typing in a new one manually. To set up an option order, click the Option Chain button to easily pick an option contract.
Use the Advanced panel to include additional order attributes and to create OCO, profit-taking or hedging orders.
The Order Entry tile supports different modes, and you can modify the mode to fit your trading style. The above image shows the panel in Interactive mode.
To change the Order Entry mode
- Click the configuration gear icon in the top right corner of the panel's title bar and select Settings.
- Select the Order Entry tool style. Choose from:
- Interactive: Enables the click-able "Position" and "Bid/Mid/Ask" ruler to fill in order parameters.
- Simplified: Smaller display with fewer selections.
- Rapid Transmit: Quickly submit the order by clicking the Sell or Buy button. This version does not include a "Submit" button.
Use the Integrated Search Tool
The Integrated Search Tool in the top right corner of the anchor window lets you search for tools and features in the application as well as for contracts in our database to add to your trading pages. Check "Application" and select from the list of findings to go directly to your destination. Check "Contracts" and select to add an instrument directly to your trading page.
Search for a feature or instrument
- Enter the name of the feature, instrument or type of instrument you are looking for.
- Check Application, Contract or both.
- Click the return that matches your search criteria.
Note: When you use the The search will open and focus in on the feature, or begin adding the instrument to the trading page.
Add and Remove Fields
You can quickly add and remove fields from most windows by holding your mouse over the field name to invoke the insert/remove column commands.
To add or remove columns from a window
- Hold your mouse over a field to invoke the quick insert/remove commands.
- Click the “+” icon to insert a column to the left of the selected column. Pick from the drop-down picklist that appears when you click "Insert Column."
- Click the “x” icon to remove the selected column from the window. You can re-add it at any time.
You can choose not to see these icons by deselecting the feature "Quickly insert/remove columns from column headers" from the Display>Settings page in Global Configuration.
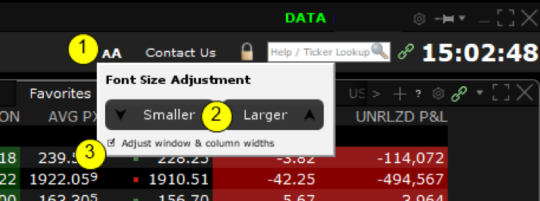
Mosaic Fonts
Quickly make the Mosaic windows font larger or smaller.
To adjust font size throughout Mosaic
- From Mosaic menu, click the Font Size Adjustment icon.
- Click "Smaller" or "Larger" to change the font size. Notice that the font size changes in Mosaic as you click.
- Check "Adjust window & column widths" to keep the font-to-window size ratio the same. If unchecked, all windows will remain the same size and only the font size will change.
The Mosaic has two editing modes: Locked and Unlocked.
By default, the Mosaic workspace is in "locked" mode when you launch the tool. When the workspace is locked, it acts as a single, grouped unit. You cannot add, remove, re-size or move any component windows, but you can re-size the entire workspace, and each component within will be scaled accordingly. Note that you can, however, modify windows grouping assignments. We lock the workspace by default to avoid potential issues of inadvertently deleting and moving individual components.
If you want to rearrange the windows, add or remove windows, or re-size individual component windows, click the Lock icon to unlock the workspace.
Layout Locked
When the Mosaic layout is locked, the workspace is outlined in black and the lock label indicates the status. Keep the layout locked until you need to add, remove or resize individual windows.
To unlock the layout for editing
- Click the "lock" icon located to the left of the search field.
Layout Unlocked
When the Mosaic layout is unlocked, the workspace is outlined in green and the lock icon appears to be open to indicate the status. When unlocked, windows within the workspace frame act as separate, ungrouped windows, and you are able to remove them, re-size them, and add new windows to the layout frame.
Note: Be sure to always lock the workspace when you have finished editing to avoid unwanted changes or deletions to the Mosaic. You will not be allowed to exit the application if the workspace is unlocked.
To lock the layout
- Click the "lock" icon
Use the Layout Library to quickly create a custom workspace layout. Simply peruse the Layout Library and select a layout, for example "Option Trading" or "Futures Spreads." Add it to your platform with a single click, and easily toggle between layouts by clicking the tab along the bottom of the TWS frame.
To use the Layout Library
1. Click the Add Tab "+" icon at the end of the tabset along the bottom of the frame.
2. Select "Layout Library."
3. Browse layouts and click Details to find out more about any layout.
4. Click Add Layout to create the layout. It will appear as a new, named tab along the bottom of TWS.
Use the layout as-is, or unlock and edit it to make it your own. You can add, remove and re-size tools, and use windows linking to link tools within the layout. Modify background and font colors, included fields and the order of fields on most windows.
Add as many layouts as you need. Alternatively, create a layout from scratch by selecting "Create a New Custom Layout" instead of "Open the Layout Library."
To log in to TWS
- Double-click the Trader Workstation icon that was placed on your desktop during installation.
- Choose between Live and Paper trading by clicking the desired button. If you choose Live Trading the login box is dark blue. If you choose Paper Trading the login box is dark red.
- Enter your User name and Password and click Log In.
Rockfort Markets was granted a Derivate Issuer License in New Zealand, this requires us to adhere to strict rules and regulations and means we are monitored by the Financial Markets Authority. The FSPR or Financial Service Provider Register is simply a register of financial companies in New Zealand, this is been abused by a number of overseas companies trying make out they have a license when in fact they do not. They are often not even based in New Zealand.
You should only deal with licensed companies and carefully check who you are dealing with as many unlicensed companies do not safeguard your money and are often simply scams.
For more information please check our Licensed and Regulated page.
You can simply complete our Online Application Form.
After submitting your application, you will receive a confirmation email from us that will explain how to deposit funds and start trading.
Please contact us if you failed to receive the email.